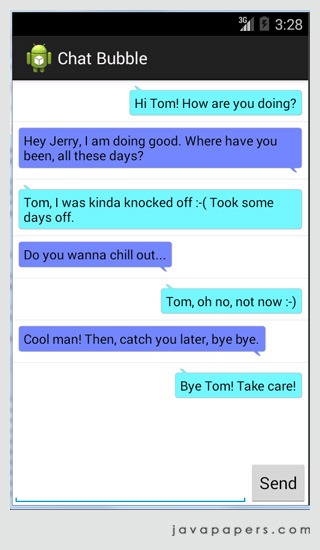
Android Chat Bubble
In this Android tutorial, we will see about how to create an Android (bubble) layout for a chat application. We will use Android ListView with adapter to create the Android chat bubble layout.
Chat bubbles are background image that expands horizontally and vertically as required based on the message posted.

Nine-patch Image
In creating Android chat bubbles, nine-patch image plays a crucial role. Nine-patch image is a bitmap which stretches to fit the content posted in the View where it is applied as a background.
A NinePatch drawable is a standard PNG image that includes an extra 1-pixel-wide border. It must be saved with the extension .9.png, and saved into the res/drawable/ directory of your project. The border is used to define the stretchable and static areas of the image. You indicate a stretchable section by drawing one (or more) 1-pixel-wide black line(s) in the left and top part of the border (the other border pixels should be fully transparent or white). You can have as many stretchable sections as you want: their relative size stays the same, so the largest sections always remain the largest.
We can use the draw9patch tool provided with the Android-sdk to create a nine-patch image. There are lots of free online tools available to generate these images. Of course, we can use Photoshop and create ourselves.


Bubble ListView with Adapter
ListView will be the container to hold the chat conversation. We will customize the underlying Adapter which is responsible for each unit of the data that is displayed in the ListView. We will have a TextView for each of the rows in the list, with a nine-patch image background.
activity_chat_singlemessage.xml
<?xml version="1.0" encoding="utf-8"?>
<LinearLayout xmlns:android="http://schemas.android.com/apk/res/android"
    android:layout_width="fill_parent"
    android:layout_height="wrap_content" >

    <LinearLayout
        android:id="@+id/singleMessageContainer"
        android:layout_width="fill_parent"
        android:layout_height="wrap_content" >

        <TextView
            android:id="@+id/singleMessage"
            android:layout_width="wrap_content"
            android:layout_height="wrap_content"
            android:layout_gravity="center"
            android:layout_margin="5dip"
            android:background="@drawable/bubble_b"
            android:paddingLeft="10dip"
            android:text="Hello bubbles!"
            android:textColor="@android:color/primary_text_light" />
    </LinearLayout>

</LinearLayout>
activity_chat.xml
<?xml version="1.0" encoding="utf-8"?>
<RelativeLayout xmlns:android="http://schemas.android.com/apk/res/android"
    android:layout_width="fill_parent"
    android:layout_height="fill_parent"
    android:orientation="vertical" >

    <ListView
        android:id="@+id/listView1"
        android:layout_width="match_parent"
        android:layout_height="wrap_content"
        android:layout_marginBottom="80dp">
    </ListView>

    <RelativeLayout
        android:id="@+id/form"
        android:layout_width="fill_parent"
        android:layout_height="wrap_content"
        android:layout_alignParentBottom="true"
        android:layout_alignParentLeft="true"
        android:orientation="vertical" >

        <EditText
            android:layout_width="wrap_content"
            android:layout_height="wrap_content"
            android:inputType="textMultiLine"
            android:ems="10"
            android:id="@+id/chatText"
            android:layout_alignParentBottom="true"
            android:layout_alignParentLeft="true"
            android:layout_alignParentStart="true"
            android:layout_toLeftOf="@+id/buttonSend" />

        <Button
            android:layout_width="wrap_content"
            android:layout_height="wrap_content"
            android:text="Send"
            android:id="@+id/buttonSend"
            android:layout_alignBottom="@+id/chatText"
            android:layout_alignParentRight="true"
            android:layout_alignParentEnd="true" />
    </RelativeLayout>

</RelativeLayout>
Chat Bubble Activity
We have a main Android Activity that is bind with the ListView coupled with the Adapter. For the sake of this example tutorial, I am changing the bubble background alternately. Those things can go in the business logic of you application.
ChatBubbleActivity.java
package com.javapapers.android.chat;

import android.app.Activity;
import android.content.Intent;
import android.database.DataSetObserver;
import android.os.Bundle;
import android.view.KeyEvent;
import android.view.View;
import android.view.View.OnKeyListener;
import android.widget.AbsListView;
import android.widget.Button;
import android.widget.EditText;
import android.widget.ListView;

public class ChatBubbleActivity extends Activity {
    private static final String TAG = "ChatActivity";

    private ChatArrayAdapter chatArrayAdapter;
    private ListView listView;
    private EditText chatText;
    private Button buttonSend;

    Intent intent;
    private boolean side = false;

    @Override
    public void onCreate(Bundle savedInstanceState) {
        super.onCreate(savedInstanceState);
        Intent i = getIntent();
        setContentView(R.layout.activity_chat);

        buttonSend = (Button) findViewById(R.id.buttonSend);

        listView = (ListView) findViewById(R.id.listView1);

        chatArrayAdapter = new ChatArrayAdapter(getApplicationContext(), R.layout.activity_chat_singlemessage);
        listView.setAdapter(chatArrayAdapter);

        chatText = (EditText) findViewById(R.id.chatText);
        chatText.setOnKeyListener(new OnKeyListener() {
            public boolean onKey(View v, int keyCode, KeyEvent event) {
                if ((event.getAction() == KeyEvent.ACTION_DOWN) && (keyCode == KeyEvent.KEYCODE_ENTER)) {
                    return sendChatMessage();
                }
                return false;
            }
        });
        buttonSend.setOnClickListener(new View.OnClickListener() {
            @Override
            public void onClick(View arg0) {
                sendChatMessage();
            }
        });

        listView.setTranscriptMode(AbsListView.TRANSCRIPT_MODE_ALWAYS_SCROLL);
        listView.setAdapter(chatArrayAdapter);

        //to scroll the list view to bottom on data change
        chatArrayAdapter.registerDataSetObserver(new DataSetObserver() {
            @Override
            public void onChanged() {
                super.onChanged();
                listView.setSelection(chatArrayAdapter.getCount() - 1);
            }
        });
    }

    private boolean sendChatMessage(){
        chatArrayAdapter.add(new ChatMessage(side, chatText.getText().toString()));
        chatText.setText("");
        side = !side;
        return true;
    }

}
ChatArrayAdapter.java
package com.javapapers.android.chat;

import android.content.Context;
import android.graphics.Bitmap;
import android.graphics.BitmapFactory;
import android.view.Gravity;
import android.view.LayoutInflater;
import android.view.View;
import android.view.ViewGroup;
import android.widget.ArrayAdapter;
import android.widget.LinearLayout;
import android.widget.TextView;

import java.util.ArrayList;
import java.util.List;

public class ChatArrayAdapter extends ArrayAdapter {

	private TextView chatText;
	private List chatMessageList = new ArrayList();
	private LinearLayout singleMessageContainer;

	@Override
	public void add(ChatMessage object) {
		chatMessageList.add(object);
		super.add(object);
	}

	public ChatArrayAdapter(Context context, int textViewResourceId) {
		super(context, textViewResourceId);
	}

	public int getCount() {
		return this.chatMessageList.size();
	}

	public ChatMessage getItem(int index) {
		return this.chatMessageList.get(index);
	}

	public View getView(int position, View convertView, ViewGroup parent) {
		View row = convertView;
		if (row == null) {
			LayoutInflater inflater = (LayoutInflater) this.getContext().getSystemService(Context.LAYOUT_INFLATER_SERVICE);
			row = inflater.inflate(R.layout.activity_chat_singlemessage, parent, false);
		}
		singleMessageContainer = (LinearLayout) row.findViewById(R.id.singleMessageContainer);
		ChatMessage chatMessageObj = getItem(position);
		chatText = (TextView) row.findViewById(R.id.singleMessage);
		chatText.setText(chatMessageObj.message);
		chatText.setBackgroundResource(chatMessageObj.left ? R.drawable.bubble_a : R.drawable.bubble_b);
		singleMessageContainer.setGravity(chatMessageObj.left ? Gravity.LEFT : Gravity.RIGHT);
		return row;
	}

	public Bitmap decodeToBitmap(byte[] decodedByte) {
		return BitmapFactory.decodeByteArray(decodedByte, 0, decodedByte.length);
	}

}
ChatMessage.java
package com.javapapers.android.chat;

public class ChatMessage {
	public boolean left;
	public String message;

	public ChatMessage(boolean left, String message) {
		super();
		this.left = left;
		this.message = message;
	}
}
Download the Android Studio project Chat Bubble
Thanks to Vijay for asking me to try out Android Studio. It is built on the IntelliJ Idea platform. My first experience with Android Studio is good and it is better than my favorite Eclipse. I am going to stick with Android Studio for all Android projects and tutorials. But Eclipse will continue be my IDE for Java development.
출처:http://javapapers.com/android/android-chat-bubble/


